
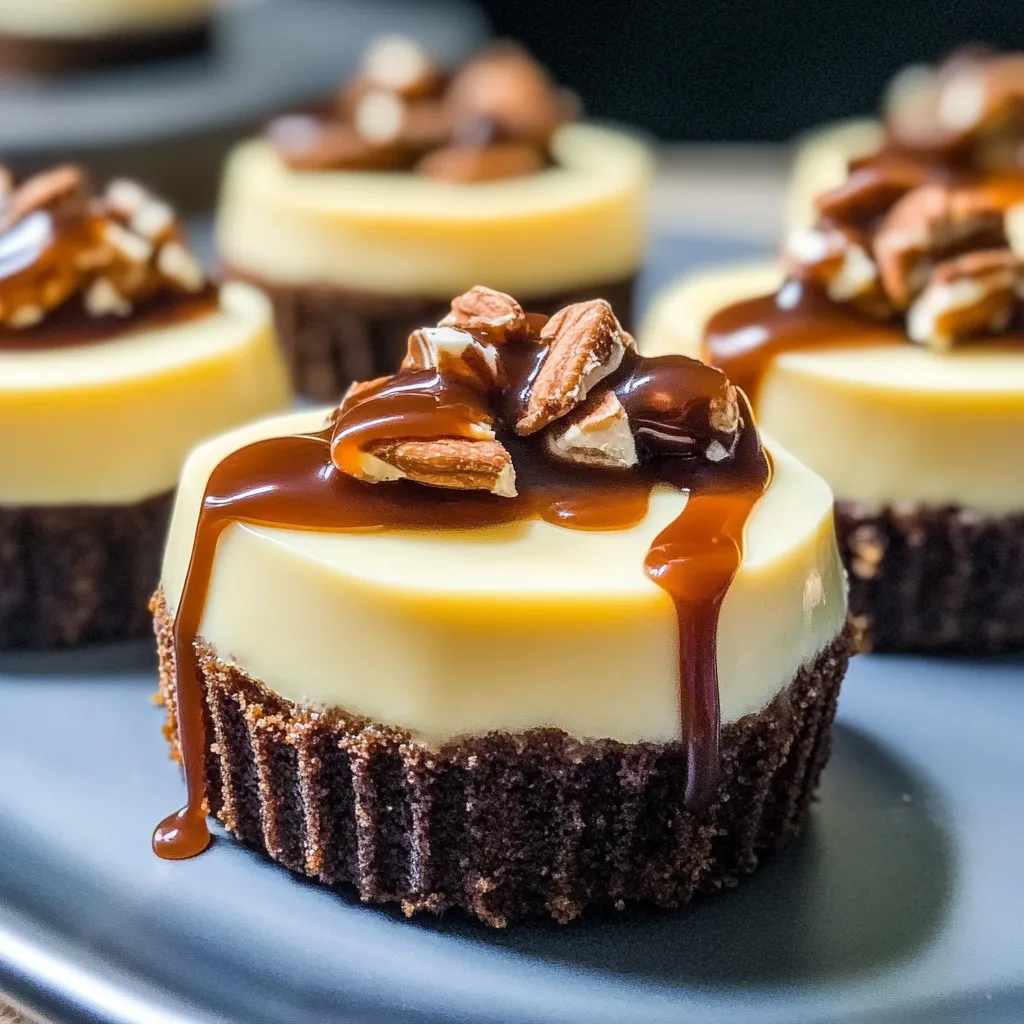
Irresistible Mini Turtle Cheesecakes Decadent Sweet Indulgence

Ah, nothing warms the heart quite like the sweet scent of baking wafting through the kitchen, wouldn’t you agree? I can still remember the first time I tried a turtle cheesecake. It was at a friend’s gathering, and I was immediately smitten by the combination of creamy cheesecake, rich caramel, crunchy pecans, and luscious chocolate. That decadent dessert danced on my taste buds, and ever since, I’ve been on a quest to capture that melted-in-your-mouth magic in my own kitchen. Today, I’m thrilled to share my take on that classic with my family-friendly, fun-sized version: Irresistible Mini Turtle Cheesecakes! These little gems are perfect for any occasion—whether it’s a cozy night in or a festive celebration with friends.
So come, roll up your sleeves, and let’s create some scrumptious mini turtle cheesecakes that will have everyone swooning!
Why You’ll Love This Recipe
- Perfectly portioned for a sweet treat without the guilt.
- Easy to make with just a handful of simple ingredients.
- All the classic turtle cheesecake flavors in every bite.
- Great for gatherings—everyone will ask for the recipe!
- Customize them with your favorite toppings or crusts.
Ingredients
Gathering the right ingredients is the first step toward cheesecake bliss! Here’s what you’ll need:
- For the crust:
- 1 cup graham cracker crumbs
- 1/4 cup granulated sugar
- 1/2 cup unsalted butter, melted
- For the cheesecake filling:
- 16 oz cream cheese, softened (full-fat is best for creaminess!)
- 2/3 cup granulated sugar
- 2 large eggs
- 1 teaspoon vanilla extract
- 1/4 cup sour cream
- For the topping:
- 1/2 cup caramel sauce (store-bought or homemade)
- 1/4 cup chocolate sauce
- 1/2 cup chopped pecans (toasted for extra crunch!)
Note: For an extra touch, make sure your cream cheese is at room temperature. This not only helps it blend nicely, but it also gives you a super smooth filling!
Step-by-Step Instructions
Now, let’s get into the fun part—making our mini turtle cheesecakes! Follow these simple steps, and soon your kitchen will be filled with the irresistible aroma of sweet indulgence.
- Preheat the oven: Preheat your oven to 325°F (160°C). This ensures your cheesecakes will bake evenly and perfectly.
- Prepare the crust: In a mixing bowl, combine the graham cracker crumbs, sugar, and melted butter. Mix until it resembles wet sand. Spoon about 1 tablespoon of the crust mixture into each cavity of a mini muffin tin, pressing it down firmly with a small cup or your fingers.
- Bake the crusts: Bake the crusts in your preheated oven for about 5–7 minutes or until they are lightly golden. Remove them from the oven and let them cool while you prepare the filling.
- Make the cheesecake filling: In a large mixing bowl, beat the softened cream cheese until smooth and creamy. Add the sugar and mix until well combined. Next, add the eggs one at a time, mixing on low speed just until incorporated. Overmixing can lead to cracks—so keep it gentle!
- Finish the filling: Stir in the vanilla extract and sour cream until just blended. Your mixture should be silky and creamy—absolutely dreamy!
- Fill the tins: Spoon the cheesecake filling into each mini muffin tin on top of the cooled crusts. Leave about 1/4 inch of space at the top.
- Bake: Bake the mini cheesecakes for about 15–18 minutes, or until the edges are set but the center still has a slight jiggle. This will ensure a creamy texture without overcooking.
- Cool down: Turn off the oven and crack the door slightly. Let the cheesecakes cool in the oven for about 30 minutes. This step helps prevent cracks!
- Chill: After cooling in the oven, transfer the mini cheesecakes to the refrigerator to chill completely for at least 2 hours (or overnight if you can wait!)
- Topping time: Once chilled, drizzle with caramel and chocolate sauces, and sprinkle with chopped pecans. Feel free to be generous—this is where the magic happens!
- Serve: Carefully pop the cheesecakes out of the muffin tin using a small knife if needed. Arrange them on a platter and get ready for the oohs and aahs!
Tip: Avoid cross-contamination by using separate utensils for the caramel and chocolate sauces. You want each bite to be a perfect flavor sensation!
Pro Tips & Variations
Want to switch things up a bit? Here are some playful variations and tips for making these mini turtle cheesecakes even more delightful:
- Flavor Twists: Add a tablespoon of cocoa powder to the cheesecake filling for a chocolate version or some espresso powder for a mocha delight!
- Dietary Swaps: Make this recipe gluten-free by using gluten-free graham crackers for the crust. You can also try dairy-free cream cheese alternatives if you need a non-dairy option.
- Fruit Toppings: Top your cheesecakes with fresh berries for a fruity contrast. Strawberries, raspberries, or even cherries would add a lovely pop of color and flavor!
- Layer Them Up: Create a layered effect by adding a bit of the cheesecake filling, then a layer of your caramel sauce, and topping it off with the rest of the filling.
The beauty of these mini turtle cheesecakes is their versatility! Feel free to play around with the ingredients and make them your own.
Serving Suggestions
These mini turtle cheesecakes are so charming and elegant; they deserve to be showcased! Here’s how I love to serve them:
- On a spring-themed platter adorned with freshly picked mint leaves, these mini delights look stunning.
- Pair them with a hot cup of coffee or a glass of chilled milk for that delightful sweet and caffeinated moment.
- For game nights or get-togethers, set them up as part of a dessert bar alongside some whipped cream, extra toppings, and fruits for guests to customize their treats!
Picture this: family and friends gathered around, laughter in the air, and these adorable cheesecakes stealing the spotlight. How cozy and inviting does that sound?
Storage Tips
Want to save some of those luscious mini turtle cheesecakes for later? Here’s how to store them without losing any of that delicious flavor:
- Refrigerating: Keep any leftovers in an airtight container in the fridge for up to 3 days. They’ll stay fresh and creamy!
- Freezing: If you want to freeze them, wrap each mini cheesecake individually in plastic wrap and then place them in a freezer-safe bag or container. They’ll last up to 2 months. Just thaw them in the fridge overnight before serving.
- Reheating: If you prefer them a little warm, simply microwave them for about 10–15 seconds. Just be careful not to overheat, or you’ll lose that lovely, creamy texture!
Can I use a different type of crust?
Absolutely! You can substitute graham cracker crumbs with crushed Oreos for a chocolatey twist or use any cookie of your choice. Just make sure your crust holds together well!
What can I use instead of cream cheese?
If you’re looking for a dairy-free option, you can use vegan cream cheese. Just ensure that you’re using a brand that you enjoy, as the flavor will come through in the finished cheesecake.
Can I make mini turtle cheesecakes without eggs?
Sure! You can use a flaxseed meal mixture (1 tablespoon of flaxseed meal with 2.5 tablespoons of water) for every egg, or even opt for a commercial egg substitute. Keep in mind the texture will be slightly different, but still delicious!
What’s the best way to serve mini turtle cheesecakes?
These are delightful on their own, but you can elevate them further by serving them with a scoop of vanilla ice cream or a dollop of whipped cream on the side for an extra indulgent treat!
How do I prevent my cheesecakes from cracking?
To prevent cracks, be sure not to overmix the batter, and let your cheesecakes cool slowly in the oven after baking. Also, keeping the oven door slightly ajar during cooling helps!
Conclusion
There you have it, dear friends! My Irresistible Mini Turtle Cheesecakes recipe is not just about the delightful flavors and creamy textures; it’s about creating memories, sharing laughter, and indulging those sweet cravings. I hope you’re feeling inspired to whip these up and impress your family and friends!
If you try this recipe, I would absolutely love to hear how your mini cheesecakes turn out! Feel free to drop a comment or share your mini cheesecake photos. Let’s spread the sweetness and joy of baking together! Happy baking!
Print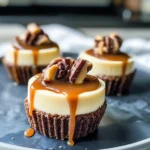
Irresistible Mini Turtle Cheesecakes Decadent Sweet Indulgence
- Total Time: 55 minutes
- Yield: 24 mini cheesecakes 1x
Description
Savor the rich flavor of Mini Turtle Cheesecakes a perfect treat for sweet indulgence lovers Quick easy and absolutely irresistible 153 chars
Ingredients
Instructions
Notes
A delicious and easy-to-make mini turtle cheesecake recipe, perfect for any occasion with creamy cheesecake, rich caramel, crunchy pecans, and luscious chocolate.
- Prep Time: 30 minutes
- Cook Time: 25 minutes
- Category: Dessert
- Cuisine: American
Nutrition
- Serving Size: 24 mini cheesecakes
- Calories: 250
- Sugar: 12g
- Fat: 18g
- Carbohydrates: 20g
- Fiber: 1g
- Protein: 5g
Keywords: mini turtle cheesecakes, turtle cheesecake recipe, dessert, easy cheesecakes, sweet recipes