
Delicious Protein Cheesecake Indulge GuiltFree Today

Oh, where do I even begin with this Protein Cheesecake? The first time I made it, I was just trying to balance my sweet tooth with my need for some extra protein—because, let’s be honest, life is too short to skip dessert! I remember the delightful smell wafting through my kitchen as it baked; I was planning to indulge, but I might have ended up eating half of it myself before it even cooled down. It was just that good! With the velvety texture and the perfect hint of sweetness, it became an instant family favorite. Plus, I felt like I was treating myself without the guilt. If that doesn’t sound like a win-win, I don’t know what does!
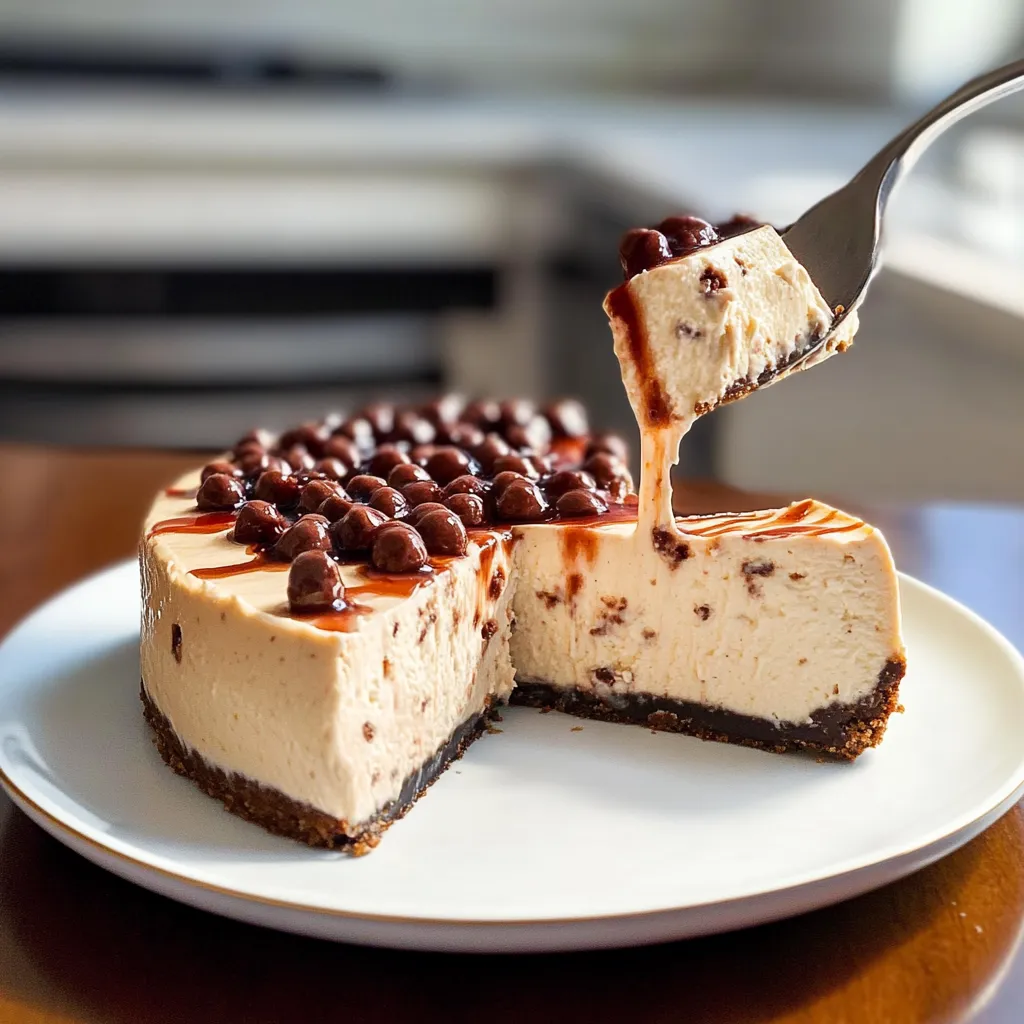
This Protein Cheesecake is not just a dessert; it’s a wholesome experience. Packed with protein and rich in flavor, it’s perfect for when you want something sweet but also want to keep things on the healthier side. Get ready to fall in love with every creamy bite!
Why You’ll Love This Recipe
- Protein-Packed: Each slice is loaded with protein, making it a great snack or dessert option.
- Easy to Make: You don’t need to be a baking pro to whip this up—simple steps for a stunning result!
- Versatile: Customize it with your favorite toppings or flavors for endless variations.
- Guilt-Free Indulgence: Enjoy dessert without derailing your healthy eating goals.
Ingredients
Here’s everything you’ll need to create the magic:
- For the crust:
- 1 cup almond flour
- 2 tbsp coconut oil, melted (or unsalted butter)
- 2 tbsp honey or maple syrup
- 1/4 tsp salt
- For the filling:
- 2 cups cottage cheese (or Greek yogurt for a creamier texture)
- 1/2 cup protein powder (vanilla or your favorite flavor)
- 1/2 cup Greek yogurt
- 1/2 cup honey or agave syrup (adjust based on your sweetness preference)
- 2 large eggs
- 1 tsp vanilla extract
- 1 tsp lemon juice (for a zesty hint)
- 1/4 tsp salt
- Optional Toppings:
- Fresh berries (strawberries, blueberries, or raspberries) for a pop of color
- Chocolate drizzle for a decadent touch
- Chopped nuts for some crunch
Step-by-Step Instructions
Now, let’s get our hands a little messy and whip this up!
- Preheat the oven: Start by preheating your oven to 350°F (175°C). This way, by the time you’re ready to bake, your oven will be nice and toasty!
- Prepare the crust: In a mixing bowl, combine the almond flour, melted coconut oil, honey, and salt. Mix until it resembles wet sand. Press this mixture firmly into the bottom of a 9-inch springform pan. Don’t worry if it crumbles a bit; just keep pushing it down. A little elbow grease never hurt anyone!
- Bake the crust: Pop the pan in your preheated oven and bake for about 10-12 minutes, or until it’s lightly golden. As it bakes, the aroma of toasted almonds will fill your kitchen—trust me, it’s heavenly!
- Make the filling: While the crust is baking, grab your blender (or a mixing bowl if you want a good workout). Add the cottage cheese, protein powder, Greek yogurt, honey, eggs, vanilla, lemon juice, and salt. Blend until everything is perfectly smooth. The mixture should be thick but not dry—think creamy clouds, my friends!
- Pour the filling: Once the crust is out and cooled slightly, pour the filling over the crust and smooth it out. Give it a gentle tap on the counter to release any air bubbles.
- Bake the cheesecake: Place it back in the oven and bake for 30-35 minutes. The edges should be set, but the center will still have a slight jiggle. Don’t worry; that’s exactly what we want! If you overbake, it’ll lose that delicious creamy consistency.
- Chill: Remove it from the oven and allow it to cool at room temperature for about an hour. After that, transfer it to the fridge for at least 4 hours or overnight if you can resist. This step lets the flavors deepen and the texture become oh-so-creamy!
Pro Tips & Variations
Let’s get creative! Here are some delightful twists you can try:
- Flavor Infusions: Add a tablespoon of your favorite fruit puree or a couple of tablespoons of cocoa powder to the filling for a chocolate version.
- Spice it Up: A pinch of cinnamon or nutmeg can elevate the flavor profile to a warm, cozy experience.
- Dairy-Free Option: Swap the cottage cheese for silken tofu blended until smooth.
- Crust Variations: Use crushed nuts or oats instead of almond flour for a different base. Just make sure to adjust the moisture accordingly!
Serving Suggestions
So, how do you enjoy this Protein Cheesecake? Well, let me set the scene for you! Imagine a sunny afternoon, your favorite iced coffee or tea in hand, and a generous slice of this cheesecake in front of you. Sprinkled with fresh berries and maybe a light drizzle of chocolate or caramel, it’s a feast for both the eyes and the belly. Serve it with a dollop of whipped cream or some yogurt on the side for that extra creaminess. Feeling fancy? Add a couple of mint leaves for an elegant touch!
This dessert is perfect for brunch with friends, as an after-dinner treat, or even as a protein-packed breakfast when you need a jump start.
Storage Tips
Now, let’s talk about leftovers (if they even last!). To keep your Protein Cheesecake fresh:
- Refrigerate: Store the cheesecake in an airtight container in the fridge for up to 5 days. It tastes even better after a day in the fridge as the flavors meld together!
- Freeze: You can freeze slices (wrapped tightly in plastic wrap and foil) for up to 2 months. Just remember to thaw it in the fridge overnight before enjoying it again.
- Reheat: If you prefer your cheesecake slightly warm, pop it in the microwave for about 20 seconds, but be cautious not to overheat it; we want to keep that creamy texture!
Can I use a different type of protein powder?
Absolutely! Feel free to experiment with different flavors of protein powder based on your taste preferences. Just keep in mind that it may alter the final taste a bit, so adjust the sweetener if needed!
Is this cheesecake suitable for people with lactose intolerance?
If you swap the cottage cheese for silken tofu and use dairy-free yogurt, you can easily make a lactose-free version. It’s all about making it work for you!
What can I do if my cheesecake cracks?
Cracks can happen, especially if the cheesecake bakes for too long. Next time, you might try baking it in a water bath, which helps prevent cracking. If it does crack, don’t fret—just cover it with toppings!
Can I make this recipe ahead of time?
Yes! This cheesecake is perfect for making ahead of time since it needs at least 4 hours to chill. Making it the night before is a great option, and it gives the flavors a chance to come together beautifully!
Can I use a different sweetener?
Definitely! You can use your preferred sweetener—just keep in mind that some may alter the texture slightly. A stevia or erythritol blend works well if you’re looking to cut down on sugar.
How do I know when the cheesecake is done?
The edges will be set and start to pull away from the sides of the pan, but the center should have a slight jiggle. It will firm up as it cools in the fridge!
Conclusion
I hope you give this Protein Cheesecake a try and find it as irresistible as I do! It’s such a simple yet delightful recipe that fits so many moments in life—whether you’re celebrating, indulging, or just treating yourself on a Tuesday. If you make it, I would love to hear all about your experience! Did you try any fun twists? Drop a comment below, share your story, and let me know how it turned out!

Delicious Protein Cheesecake Indulge GuiltFree Today
- Total Time: 4 hours 5 minutes
- Yield: 8 servings 1x
Description
Savor guiltfree Protein Cheesecake Discover a tasty healthy dessert packed with protein Treat yourself today without the worry Enjoy every bite 155 chars
Ingredients
Instructions
Notes
This Protein Cheesecake is a delightful dessert that combines a creamy texture with healthy protein, making it perfect for those who want a guilt-free indulgence.
- Prep Time: 20 minutes
- Cook Time: 45 minutes
- Category: Dessert
- Cuisine: American
Nutrition
- Serving Size: 8 servings
- Calories: 180
- Sugar: 5g
- Fat: 8g
- Carbohydrates: 15g
- Fiber: 2g
- Protein: 15g
Keywords: Protein Cheesecake, healthy dessert, high-protein dessert, cheesecake recipe, guilt-free dessert